Category Archives: dessert

Peach Kuchen

Posted on

I once got to spend a summer in Moscow…  Russia, not Idaho.  It was a great summer.  I learned a lot that year.  I was eighteen, just out of high school.  I learned this pie recipe from the family who housed me during my stay.  Kuchen is actually the German word for “cake,” but the usage covers this kind of pie.  It has been through many variations since I made it the first time.  This is the variety that I use today.  It was the pie I served for John’s birthday and concluded our Pi Day festivities.

I actually made two of these pies since the coconut yogurt came in exactly the amount needed for a double recipe.  It must also be noted that I am not above feeding the leftovers to my children for breakfast.

Peach Kuchen

Peach Kuchen

Preheat the oven to 400 degrees.

Combine in a 9″ pie pan:
1 1/3 cup sifted gluten free flour
¼ teaspoon baking powder
pinch of salt
2 tablespoons sugar

Cut in with a fork until well blended:
1/3 cup palm oil shortening

Pat mixture over bottom and sides the pie pan.

Arrange in pastry (Don’t overfill or the juices will overflow and burn in the bottom of your oven, trust me):
4-6 sliced peaches, canned (about 2 cans, drained), frozen, or fresh (peel if desired)

Blend in a bowl and sprinkle over the peaches:
¼ cup sugar
1/2 teaspoon allspice
1/4 teaspoon nutmeg

Bake 15 minutes.

Combine well (reuse the sugar bowl to save on dishes):
1 egg replacer egg
1 cup plain coconut yogurt

Pour yogurt mixture over peaches and bake 30 minutes longer.

Serve warm or cold as desired.

St. Lucia Day Soup and Buns

Posted on

Growing up I read about St. Lucia traditions in this book.  I have loved this Swedish tradition since childhood, but last year was our first year to celebrate it.  This year we made almost traditional St. Lucia Buns with a gluten free, vegan twist for our homeschool co-op yesterday.  Tonight the kids took a few extra St. Lucia buns to the neighbors while dressed up.  Buster made the props for himself and Little Man.

St_Lucia2013
Yesterday at our homeschool co-op I read this book about St. Lucia, and the children made St. Lucia crowns.  The boys had the option of crafting and decorating spruce trees in to remember St. Herman who shares this feast day.  One of the moms graciously made both recipes from this blog post about St. Herman Day to share alongside our St. Lucia buns and soup.  Here is a great book about St. Herman for your bookshelf.

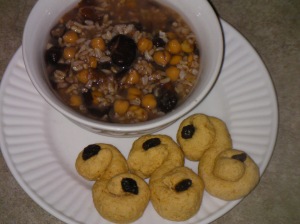
The soup we made during class yesterday, so today my family ate the leftovers.  This is a Sicilian St. Lucia soup that I modified only slightly to make it allergy friendly for my family.  The original recipe calls for wheat, but we use brown rice instead.  We also had to leave out the pepper for Buster. Moreover, the original recipe has you cook each ingredient in separate pot, but I’ve streamlined the instructions to just use one large soup pot.  Use one that holds at least seven quarts because this recipe makes a lot of soup!

St Lucia Soup and Buns
Every time I make this soup the leftover components of this soup absorb almost all of the broth, so add more water when you reheat or be content to eat it as beans and rice the next day.

Cuccia – St. Lucia Soup
1 lb uncooked brown rice
1 lb dry fava beans
1 lb dry ceci (garbanzo beans)
3 cloves garlic, minced
3 bay leaves
1 Tbsp salt, to taste
1/3 cup olive oil (optional, I’ve always forgotten this ingredient and nobody seems to mind)
Lots of water

Soak the beans in separate bowls over night.

About three hours before dinner drain and rinse the fava beans and place them in a pot covered well with water.  Add the garlic and bay leaves to the pot.  Bring to a boil and reduce to simmer for one hour. Stir occasionally,  skim off any foam, and add water as needed to keep the beans covered.

After one hour add the garbanzo beans with additional water.  Bring back to a boil and reduce to simmer for another hour.  Stir occasionally,  skim off any foam, and add water as needed to keep the beans covered.

After this hour add the rice and the salt to the pot with 4-6 cups of additional water, so that the rice will have enough water to cook while still leaving you with soup.  Stir well and place the lid on the pot.  Bring to a boil, and reduce to simmer for 45 minutes to an hour.  Add more water if necessary.

Adjust salt to taste and pour olive oil over the top as desired.

_______________________

I started with the St. Lucia Bun Recipe here and worked to make it vegan.  Last year I tried it with yeast, and this year I resorted to baking powder.  It was missing the yeasty flavor, but we liked the outcome.

Gluten Free – Vegan St. Lucia Buns

1/4 cup coconut oil
3/4 cup almond milk
1/4 cup warm water
1/2 teaspoon saffron threads, crumbled
2 1/2 cups all-purpose gluten-free flour
1 teaspoon guar gum (omit if using a blend that already includes xanthan or guar gum)
2 teaspoons baking powder
1/3 cup sugar
1/4 teaspoon salt
1 Tbsp Ener-G egg replacer powder
raisins, as garnish

Preheat your oven to 375 degrees F.

In a small microwave safe bowl combine the coconut oil, milk, water, and crumbled saffron threads. Heat in the microwave on high for 30 seconds and stir. Microwave for another 15 seconds, and stir. If the oil is not melted, heat for another 15 seconds until it is. Set the milk mixture aside.

In the bowl of a stand mixer, fitted with the paddle attachment, combine the dry ingredients, and mix well.

Add the liquid mixture and mix until the dry ingredients have incorporated the wet ingredients. Turn the mixer up to high and allow it to beat for a minute or so. Some of the dough should begin to pull away from the sides of the bowl and should be relatively smooth, but tacky to the touch. If the dough seems too stiff, begin to add a little bit more milk, a tablespoon at a time, beating in between additions until the proper consistency is reached.  If the dough is too sticky, add more flour a tablespoon at a time until it fits the above description.

Turn the dough out onto a very lightly floured surface, and divide with a bench scraper into 10-12 equal portions.

For each portion of dough sprinkle very lightly with flour and roll back and forth into a rope about 9 inches in length that tapers slightly at each end. The dough should be pretty easy to handle. Place the rope of dough perpendicular to your body, and curl one end of the dough toward the right and back on itself in a coil. Curl the other end of the dough back on itself in the opposite direction in a coil (see photo). Repeat with the remaining pieces of dough.

Place the pieces of shaped dough on a nonstick or parchment lined rimmed baking sheet about 2 inches apart from one another.  Place the raisins in the center of the two coils at the end of each roll.  Brush each roll with a little almond milk.

Place the rolls in the center of the preheated oven and bake rotating once during baking for 12-15, or until cooked throughout. Since these are vegan, they won’t brown the same as other baked goods, but they will taste great anyway.

Pan Seared Pineapple

Posted on

Snacks around here can get interesting.  I rarely buy prepackaged food.  Allergy friendly snack foods are quite expensive, so I save most of them for special occasions.

Here is a run down of snack ideas off the top of my head:

Fresh fruit – 90% of the time
Veggies with hummus
Fire ants on a log (Texas style – use Craisins instead of raisins)
Sweet potato fries
Kale chips
Dried fruit
Nuts
Roasted pumpkin seeds
Muffins
toast
homemade popsicles
smoothies
Vitamix “ice cream” – frozen fruits and nut milk
snow cones with concentrated fruit juice in the place of dyed syrup
rice pudding
fermented vegetables
random scraps of leftovers

We ate leftovers for dinner, so I didn’t have much to write.  Then I realized that I had some fresh pineapples from this week’s produce basket that I was avoiding.  I didn’t really want to eat cold pineapple during this chilly week, so we tried something new.  It turned out so well that it is worthy of it’s own post.

Pan Seared Pineapple

Pan Seared Pineapple

1 fresh pineapple cut into spears
Drizzle with agave nectar, maple syrup, or honey
Add light dusting of allspice (or cinnamon if you aren’t allergic)

Heat a cast iron skillet over medium heat.  Toss the pineapple spears with the other ingredients.

Pan sear the pineapple until golden brown.  Drizzle with a bit more agave and serve.

Confession:
We liked this so well that the five of us consumed three whole pineapples tonight.  I guess it’s good that we didn’t let them go bad, right?

Geography Studies: Norway

Posted on

We kept our study of Norway simple these last two weeks.  We read our books from the library and finished our notebook pages.  However, we didn’t spend much time online looking up interesting information and videos.  Mostly we just listened to the Norwegian folk song on our Wee Sing CD and the national anthem.


Sami felt designs – 

In my craft book they call these Lapland felt squares, but the term “Lap” comes from a racial slur on the Sami people.  So I think that we will avoid the use of that term.  The Sami are reindeer herders from the far north portions of Norway, Sweden, and Finland.  Their beautiful embroidered clothing patterns are what we tried to mimic in our craft project.

SANYO DIGITAL CAMERA

You could also try your hand at Rosemaling, or Norwegian rose painting.

For our Norwegian recipe, we chose a dessert since Norwegian meals are quite similar to Swedish meals that we tried before I started this blog.  This recipe was also quite simple for the children to help prepare.  They were able to do most steps on their own with minimal supervision.  Their favorite part was mashing the berries through the sieve.

Red Fruit Pudding

Red Fruit Pudding

2 lbs assorted berries (we used 1 lb fresh sliced strawberries and 1 cup each frozen blueberries and blackberries)
3 cups water
1/4 cup sugar
1/4 cup tapioca starch (or cornstarch)

In a medium sized pot slowly heat the berries, water, and sugar over medium heat.  Cook for five to ten minutes until the berries are soft.

Strain and press through a fine mesh sieve.  Reserve all the liquid in a large bowl, and discard the pulp and seeds.  Unless of course your eight year old offers to eat the pulp and by all means let him.  All that fiber is good for him.

In a small bowl whisk together the tapioca starch and about one cup of the reserved liquid.

Return all of the liquids to the pot and whisk them together.  Bring the pudding to a boil and reduce to simmer for five minutes.

Chill for several hours before serving.  Enjoy!

Rice Pudding

Posted on

Last night we had a potluck dinner at church.  Allergies are hard at group meals.  We do our best at potlucks, but often I simply feed the kids before we attend and take along a simple dish or a dessert to share.   This time we took rice pudding.  It is easy and my kids love it.  It does have to cook low and slow, but it’s worth the wait.  You can even cut out a few steps by using leftover rice if you prefer.

I have made this with lots of different varieties of rice.  Arborio is the most decadent; brown rice is heartier.  Each variety of rice has it’s merits, but I think my favorite two brown rice choices are jasmine or short grain brown rice.  However, if you don’t have those varieties on hand, long grain brown rice works just as well as the others.  Last night I used brown jasmine rice.

Another great thing about rice pudding is that you can dress it up with dried fruit, nuts, and spices if you want.  Cinnamon is the most common choice, but I’m allergic.  My favorite spices are nutmeg and allspice or cardamom.  I just saw an amazing idea to try saffron and almonds as a combination.  Today I will share the basic recipe that makes enough to share.

You can sweeten the pot with your choice of sugars.  Brown sugar and maple syrup add more depth of flavor than white sugar. Coconut sugar and honey are good options, too.  Just know that if you choose a liquid sweetener, it will take longer to cook unless you reduce the amount of milk you use.  Neither option is right or wrong, it’s just a matter of  how much time you want to wait to indulge.

This could easily be done in a crock pot, too.  Just remember to remove the lid towards the end, or you will have rice soup, not rice pudding.

Rice Pudding Rice Pudding

3 cups uncooked brown rice
6 cups water
1/2 tsp salt
1 can full fat coconut milk (or your favorite milk)
2 cups almond milk (or your favorite milk)
1 1/3  to 2 cups sweetner of choice, to taste (I like the lower side myself, start small and taste test liberally)
1 Tbsp vanilla extract
Spices of your choice (optional)

In a large pot covered with a lid, bring rice, water, and salt to a boil.  Reduce to low and cook with the lid for 40 minutes.

If you are using leftover rice, start here:
Pour in the milk, sweetener, and vanilla (and any spices).  Raise the heat to bring the pudding back to a boil while stirring constantly.

Reduce the heat to low and stir every 8-10 minutes.  This step can take anywhere between one and two hours depending on how much liquid you use.  If the pudding isn’t soft enough, but it is running out of liquid, add more milk or a little water.  Just add enough to keep it from burning while it continues to cook but not enough to make it soupy.  If you add too much liquid, you won’t ruin the pudding; you will just have longer to wait before enjoying.  The pudding is done when you are happy with the results.

Add nuts and fruit if you want and enjoy!